written by Manjeet Dhillon
The surrender of British forces to the Imperial Japanese Army on 15 February 1942 was more than a military defeat, it was a shattering of colonial dominance in Southeast Asia. In his compelling talk, Zafrani Amran explores the calculated strategies, critical oversights, and unforeseen events that led to this seismic event.
Japan’s Rise to Power and Expansionist Ambitions
From the Meiji Restoration in 1868 to the early 20th century, Japan transformed from a feudal society to a formidable industrial power. This modernisation fuelled its ambitions for regional dominance, culminating in its aggressive expansion across Asia. The slogan “Fukoku Kyohei” (Rich Country, Strong Army) guided the nation’s transformation.
By the late 1930s, Japan faced crippling resource shortages due to international embargoes, particularly on oil and rubber. These pressures drove its decision to secure Southeast Asia’s rich resources, making Malaya a critical target.
Key milestones in Japan’s rise include:
| Event | Year | Significance |
| Meiji Restoration | 1868 | Japan begins its modernisation process.Formation of the Imperial Japanese Army and Navy |
| Treaty of Ganghwa | 1876 | Opening Korea to Japanese influence |
| First Sino-Japanese War | 1894-1895 | Japan defeats China, gaining control of Taiwan and Korea. |
| Anglo Japanese Alliance | 1902-1923 | Japanese forces provided military support as part of this alliance, a role evident during the Singapore Mutiny of 1915. |
| Russo-Japanese War | 1904-1905 | Japan defeats Russia, emerging as a major power in Asia. |
| Annexation of Korea | 1910 | Japan formally annexes Korea. |
| Invasion of Manchuria | 1931 | Japan seizes control of Manchuria. |
| Second Sino-Japanese War | 1937-1945 | Japan invades China. (Marco Polo bridge incident) |
| Tripartite Pact, | September 27, 1940 | a military alliance between Germany, Italy, and Japan, aimed to deter U.S. intervention in World War II |
| Occupied French Indochina | July 1941 | To secure its supply lines and further isolate China. |
| Capture of Lashio and closure of the Burma Road | April 1942 | To further isolate China, Japan closed the Burma Road, a key supply route for Western aid. |
Japan’s Road To Conquest
Japan’s prolonged war with China drained its resources. To secure vital supplies and cut off Chinese access to foreign aid, Japan occupied French Indochina, a move facilitated by the Vichy French regime (a pro-German regime).

Burma road
Image source: https://www.dangerousroads.org/asia/china/321-burma-road-china.html
Faced with a crippling U.S. oil embargo, Japan sought alternative resources in Southeast Asia, particularly the oil-rich Dutch East Indies. Despite attempts at negotiation, the Dutch, backed by the U.S., refused to meet Japan’s demands. Recognising the intransigence of the Dutch and the urgency of its resource needs, Japan concluded that military force was the only viable option. To secure these resources and neutralise potential threats, Japan launched a bold military campaign. The attack on Pearl Harbor and the invasion of Malaya were crucial steps in this strategy, by neutralising the U.S. Pacific Fleet and capturing key British military bases, Japan aimed to create a defensive perimeter in the Pacific and secure its resource supply lines.
The desire for natural resources, particularly oil, and the pursuit of a “Greater East Asia Co-Prosperity Sphere” propelled Japan towards a fateful confrontation with the Western powers.
Preparation for War: The Malayan Campaign
To prepare for the invasion of Malaya, the Japanese military undertook a series of strategic initiatives:
● Establishing a Research Section: The “Taiwan Army Research Section,” led by Colonel Masataro Tsuji, was established to develop specialised tactics and doctrine for jungle warfare.
● Intensive Training: The Japanese military conducted extensive training exercises in Taiwan and Hainan Island, focusing on beach landings, rapid advances, and combined arms operations in jungle terrain.
● Intelligence Gathering: A network of spies (referred to as a “fifth column), including Major Kunitake, was deployed to gather critical intelligence on Malaya’s terrain, infrastructure, and British defences.
○ Major Kunitake, stationed as an assistant Japanese consul in Singapore, identified over 250 bridges crucial for military operations, enabling the Japanese to pre-plan rapid repair efforts in the event of British sabotage.
● Developing a Comprehensive Guidebook: Colonel Tsuji’s tactical manual, aptly titled “Read This Alone, And The War Can Be Won,” (これだけ読めば戦は勝てる) equipped Japanese troops with jungle warfare expertise.
Book cover: “Read This Alone, And The War Can Be Won”
Image source: https://www.jacar.archives.go.jp/aj/meta/listPhoto?LANG=default&BID=F2014120214353623900&ID=M2014120214353623902&REFCODE=C14110549200
By meticulously planning and preparing for the invasion, the Japanese were able to exploit the weaknesses in British defences and achieve a swift victory.
Singapore Naval Base
The Singapore Naval Base was a monumental engineering feat and a symbol of British naval power in the Far East. Constructed over a period of nearly 15 years, the base was intended to serve as an impregnable fortress, safeguarding British interests in the region.
The decision to establish the base was driven by growing concerns about Japanese expansionism. As Japan emerged as a regional power, the British recognised the need for a strong naval presence in Southeast Asia. The base was strategically located to protect British trade routes and to deter potential aggression from Japan.
The construction of the Singapore Naval Base began in 1923, but progress was interrupted due to political changes in Britain. The Conservative Party, which initially pushed for the construction, was replaced by the Labour Party in 1924, which halted the project due to economic concerns. Work resumed, and after nearly 15 years, the base was officially opened in 1936, featuring state-of-the-art facilities, including the world’s third-largest floating dry dock. The base’s construction was funded in part by local contributions, with the Federated Malay States and the Sultan of Johore (Sultan Ibrahim Ismail) providing significant financial support. In recognition of the Sultan’s generosity, one of the coastal defence batteries was named the Johore Battery. The base was equipped with powerful coastal defences and protected by the Royal Air Force, making it a formidable fortress.
To safeguard the naval base, the British established fixed defences organised into two Fire Commands:
| Fire Command: | Changi | Faber |
| Location: | Protected the routes leading to the naval base at Seletar. | Protected the approaches to Keppel Harbour and the western channel of the Johore Straits. |
| Armament: | Each Fire Command was equipped with:One 15-inch batteryOne 9.2-inch batterySeveral 6-inch batteries | |
The Japanese devised a two-pronged strategy to circumvent Singapore’s formidable defences. Instead of a direct frontal assault, they opted for a flanking manoeuvre, attacking from the Malayan Peninsula.
A World Awakened
While the attack on Pearl Harbor (December 8, 1941) captured global attention, another battle was unfolding in Malaya. The Battle of Kota Bharu marked the beginning of Japan’s rapid advance, exploiting British vulnerabilities with surgical precision.
On the night of December 4th, the Japanese Imperial Army had set sail from Samah Harbour in Hainan Island, their destination: the Malayan Peninsula. Meanwhile, in Singapore, a sense of security prevailed. The arrival of the powerful Royal Navy battleships, Prince of Wales and Repulse, had bolstered British confidence. These formidable warships were seen as an impenetrable shield against any potential threat.
However, the Japanese had a different plan. On December 6th, Royal Australian Air Force (RAAF) Hudson aircraft spotted the Japanese convoy stealthily manoeuvring south of Cape Cambodia. The British were alerted, but the dense monsoon clouds provided the invading force with a veil of concealment. Operation Matador was considered. This plan involved a preemptive strike into southern Thailand to disrupt Japanese landing plans. However, the British Minister in Bangkok, Joseph Crofty, strongly advised against this course of action, fearing it would provoke a wider conflict. Operation Matador was ultimately cancelled.
The following day, December 7th, the Japanese fleet appeared on the radar screens, 110 miles north of Kota Bharu. The British, caught off guard, scrambled to respond. But the thick, impenetrable fog provided the Japanese with a crucial advantage, allowing them to close in undetected. As the fog lifted, the full scale of the Japanese invasion became apparent. The British, despite their valiant efforts, were ill-prepared to counter the swift and decisive Japanese advance.
The Battle of Kota Bharu
A lone soldier, silhouetted stark against the lightning sky, pointed a trembling hand out to sea. There, riding low in the water, a dark armada materialised from the mist. Japanese warships, led by the ominous Awajisan Maru, were disgorging a terrifying wave of soldiers into landing craft.

The Awazisan Maru, also known as Awajisan Maru or Awagisan Maru Image source: https://muhammadismailibrahim.wordpress.com/2011/12/08/december-8-1941-the-battle-of-kuala-pak-amat/
The deafening roar of Japanese bombers pounded the airfields at Kota Bharu, Machang, and Gong Kedak. Explosions rocked the nearby airfield, the once-proud defenders of Kota Bharu were now a scattering of panicked men, their dreams of a valiant stand shattered by the overwhelming force of the enemy. Meanwhile, the Japanese naval escort, facing heavy losses from RAAF air attacks, considered withdrawing. However, Major General Takumi, determined to secure the beachhead, overruled the decision.
With air superiority lost and the ground defences crumbling, Brigadier Key ordered a retreat to the southern outskirts of Kota Bharu. The Japanese, under the cover of darkness, launched a final assault on the airfield, capturing it by midnight. The Dogra Regiment, though outnumbered and outgunned, fought with courage and determination. Lieutenant Close, led his men in a desperate last stand, but the relentless Japanese onslaught proved too much to bear. The fall of Kota Bharu marked the beginning of a long and painful retreat for the British forces in Malaya, a defeat that would reverberate through the annals of history.
Lone Bomber
While the Japanese 5th Division stormed the beaches of southern Thailand, another drama unfolded on the other side of the Malay Peninsula. At the battered Butterworth airfield, a lone figure emerged: Squadron Leader Arthur Stewart King Scarf. A pilot of extraordinary courage, he was the last hope for the beleaguered British forces.
As the Japanese air force rained destruction upon the airfield, Scarf defied the odds. In his battered Bristol Blenheim, he took to the skies, his mission was audacious: to strike at the heart of the Japanese invasion, targeting the enemy airfield at Singgora.
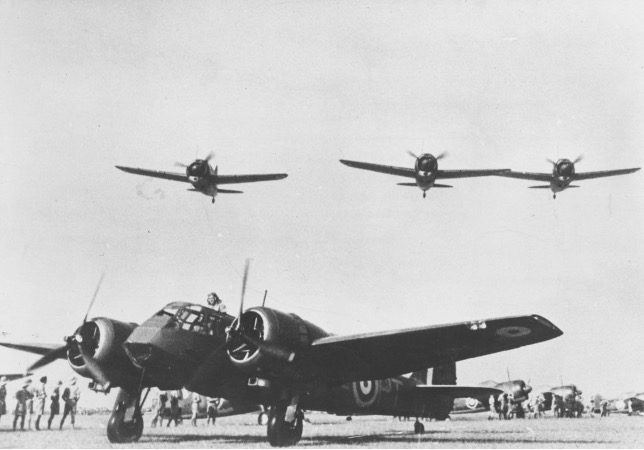
Blenheim of 62 Squadron and Brewster Buffalo fighters in Malaya 1941
(© RAF Museum X004- 7598/042/018)
With enemy fighters hot on his tail, Scarf pressed on, his plane a mere speck against the vast expanse of the sky. Undeterred, he unleashed a torrent of bombs, sowing chaos among the Japanese forces. But the cost was high, his plane, riddled with bullet holes, began to falter.
Wounded and weakened, Scarf struggled to regain control. With a final act of defiance, he attempted to land at Alor Setar airfield. However, his injuries proved too severe, he succumbed to his wounds. Squadron Leader Scarf’s bravery earned him the highest military honour, the Victoria Cross.
A Self-Inflicted Wound
The morning of December 8th, 1941, dawned with a false sense of security. The mighty HMS Prince of Wales, a symbol of British naval might, sailed out of Singapore Harbor towards the South China Sea, little did they know, their fate was sealed.
Winston Churchill’s public declaration of the Prince of Wales’s mission proved to be a fatal mistake. The British Prime Minister, in a moment of hubris, had inadvertently tipped his hand to the Japanese. Admiral Isoroku Yamamoto, the mastermind behind the attack on Pearl Harbor, seized the opportunity. He dispatched a wave of Mitsubishi G4M bombers to reinforce the already formidable air power in the region. These bombers, specially trained for ship-killing operations, were capable of launching torpedo attacks at extremely low altitudes.
The British mistook an Australian auxiliary plane for a Japanese threat, causing the Prince of Wales to turn back towards Singapore. Meanwhile, a Japanese submarine had detected the ship and dispatched its own bombers to deliver the killing blow. The Japanese attack was swift and decisive. Torpedoes tore through its hull, sending the once-mighty warship to the depths of the ocean. The sinking of the Prince of Wales and its sister ship, the battlecruiser HMS Repulse, marked a turning point in naval warfare, demonstrating the vulnerability of capital ships to air power.
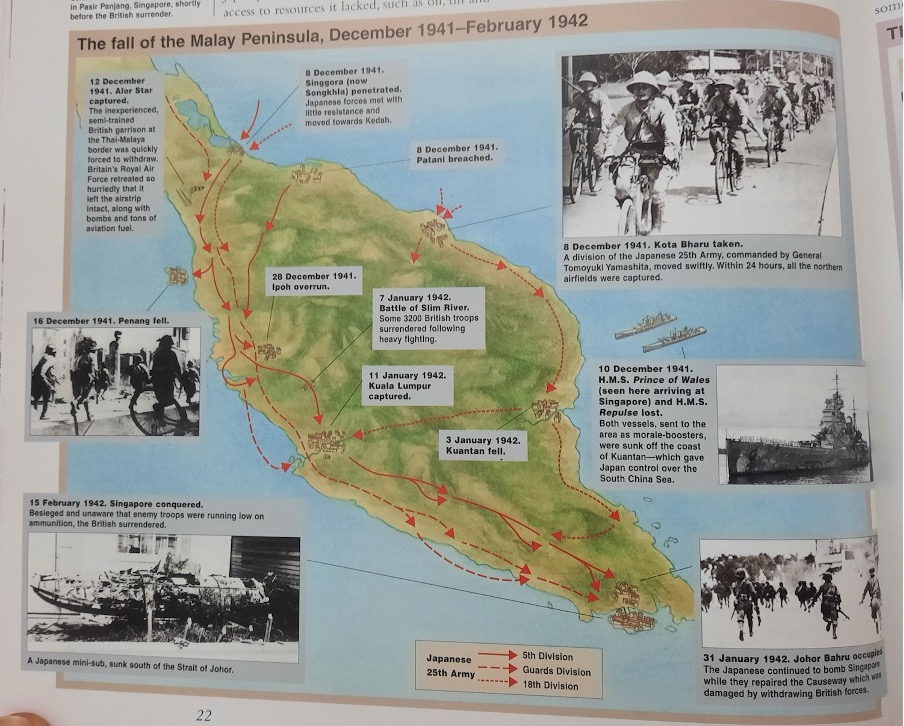
Image source: Encyclopedia of Malaysia: Government and Politics (1940-2006), Page 22
Battle of Jitra
Jitra, a sleepy hollow in northern Malaya, was about to become a battleground. As the Japanese juggernaut from the Seiki Detachment advanced southwards, a sense of dread settled over the British defenders.
The British plan was simple: hold the line with two brigades, the 15th Indian Brigade on the right and the 6th Indian Brigade on the left. A makeshift bunker at Changlun Timah, a roadblock hastily constructed, was meant to slow the Japanese advance. Several bridges were to be blown up along the Trunk Road and the main bridge over the Sungei Bata. However, the Japanese, with their characteristic ruthlessness and efficiency, had other plans.
The Japanese, on the other hand, were a well-oiled machine, having repaired damaged bridges, bypassed the British defences and launched a surprise attack on the Changlun Timah outpost. The defenders, caught off guard, were overwhelmed. The Japanese tanks, relentless and unstoppable, tore through the British lines, leaving chaos and destruction in their wake.
Meanwhile, a miscalculation by the British further compounded their woes. Mistaking a friendly force for the enemy, they destroyed a vital bridge at Manggoi River, cutting off vital supply lines. The Japanese, seizing the opportunity, exploited the confusion and pushed deeper into British territory.
British Order of Battle at Jitra, 11th Indian Division (Major General D. M. Murray-Lyon)
| Brigade | Units | Role |
| 15th Indian Brigade (Brigadier K. A. Garrett) | 1/Leicestershire Regiment, 1/14th Punjab Regiment, 2/9th Jats | Right Flank |
| 6th Indian Brigade (Brigadier W. O. Lay) | 2/East Surrey Regiment, 1/8th Punjab Regiment, 2/16th Punjab Regiment | Left Flank (coastal) |
| 28th Indian Brigade (Brigadier W. St. J. Carpendale) | 3 Gurkha Battalions | Divisional Reserve |
| 155th Field Regiment | Artillery Support | |
| 22nd Mountain Regiment | Artillery Support | |
| 80th Anti-Tank Regiment | Artillery Support |
As the British retreated, the 28th Brigade was tasked with reinforcing the beleaguered 15th Brigade. The 28th Brigade, led by a determined commander, managed to halt the Japanese advance in several key engagements. However, the overall situation remained grim. The British, outnumbered and outgunned, were struggling to contain the relentless Japanese onslaught. The British retired in disorder towards Gurun, 30 miles along the Trunk Road to the south. The fate of Malaya hung in the balance.
Battle of Kampar
After the disastrous defeat at Jitra, the British forces retreated to the Kampar line, a defensive position that offered some natural advantages. Brigadier A.C.M. Paris, temporarily commanding the 11th Indian Division, hoped to hold the line and buy time for reinforcements to arrive. However, the Japanese 5th Division, led by Lieutenant General Matsui Takuro, was relentless. The Japanese launched a series of attacks, but the British defenders, though outnumbered and outgunned, fought with courage and determination.
The Japanese, however, were not to be denied. They launched a flanking manoeuvre, landing troops at Hutan Melintang. This move threatened to cut off the British supply lines and outflank their positions. Faced with this imminent threat, Brigadier Paris was forced to order a withdrawal. The Battle of Kampar, though a valiant effort, marked another significant setback for the British forces in Malaya.
Battle of Kuantan
The coastal town of Kuantan became the next battleground, with the 22nd Brigade tasked with defending the vital airfield. The British had fortified the beaches with pillboxes and barbed wire. The Japanese, ever relentless, launched a two-pronged attack on Kuantan. The Takumi Detachment advanced directly towards the town, aiming to capture the vital airfield. Simultaneously, another Japanese force attacked from behind, infiltrating through the rugged terrain of the Jabor Valley.
The fighting was fierce, with both sides suffering heavy casualties. Lieutenant Colonel Cumming, leading the 2/12th Frontier Force Regiment, displayed extraordinary courage in the face of overwhelming odds. Despite being wounded twice, he led his men in a desperate counterattack, buying precious time for the British forces to withdraw. His heroic actions earned him the Victoria Cross.
The fall of Kuantan marked another significant setback for the British. The loss of the airfield deprived the Allied forces of a vital airbase, further weakening their ability to resist the Japanese advance. As the British retreated, the shadow of defeat loomed large over Malaya.
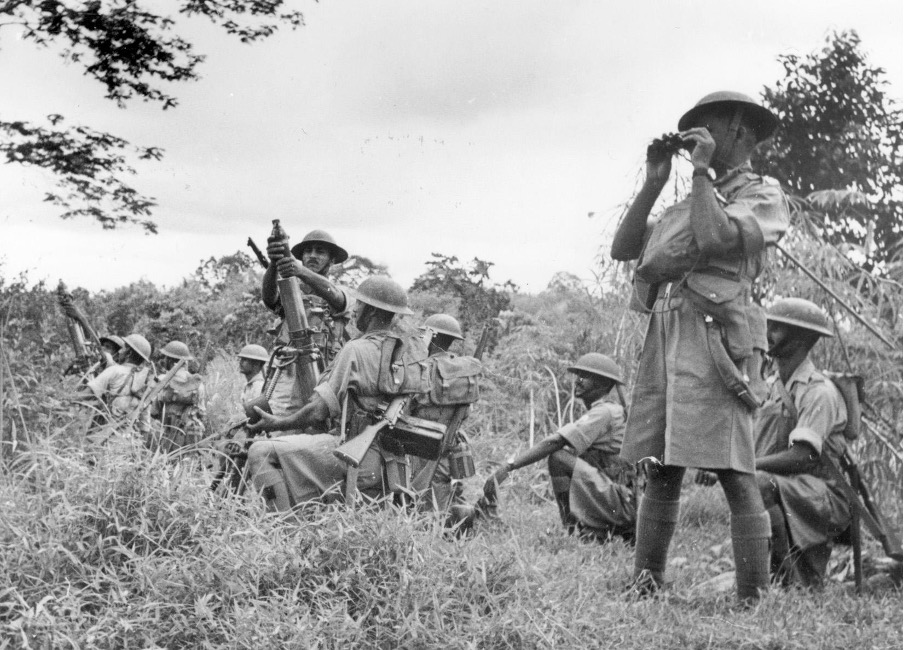
Standing their ground in the dense jungle of Malaya, Indian soldiers fire trench mortars from a tapioca patch at the oncoming Japanese. Image source: https://warfarehistorynetwork.com/article/the-fall-of-malaya-japanese-blitzkrieg-on-singapore/
Battle of Slim River
The battered British forces, reeling from the defeat at Kampar, retreated to the Slim River line. The dense jungle on either side of the road and railway track offered a semblance of security.
The Japanese, relentless as ever, launched a surprise attack in the early hours of the morning. Tanks rumbled through the jungle, their tracks tearing through the dense undergrowth. The British, caught off guard, were overwhelmed by the sheer force of the Japanese assault. Communication lines were down, and units were isolated, struggling to coordinate their defences. The British, unable to coordinate an effective defence, were forced to retreat.
The Fall of Kuala Lumpur
The relentless Japanese advance continued, and soon the heart of Malaya was within their grasp. Kuala Lumpur, the bustling capital city, fell to the invaders on January 11, 1942. The Japanese, utilising bicycles to swiftly maneuver through the dense jungle, outmaneuvered and overwhelmed the British defenders.
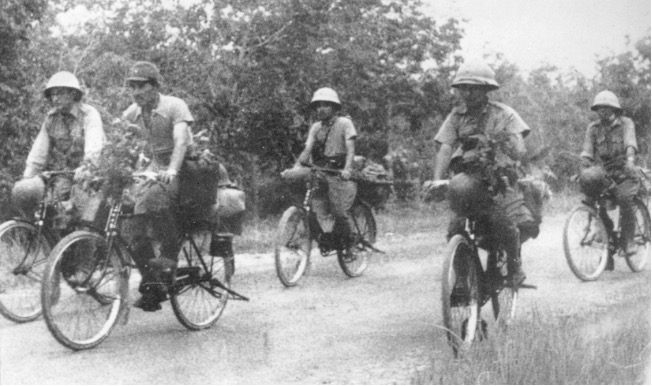
Riding bicycles, a Japanese unit rolls rapidly forward, when the tires went flat, the soldiers continued to ride on the metal rims. Image source: https://warfarehistorynetwork.com/article/the-fall-of-malaya-japanese-blitzkrieg-on-singapore/
Battle of Gemas
The final chapter of the Malayan Campaign unfolded in the southernmost state of Johor. The Australian forces, now tasked with defending the beleaguered peninsula, faced a daunting challenge. The Battle of Gemas was a desperate attempt to slow the Japanese advance. Australian troops, under the command of General Bennett, planned an ambush to inflict heavy casualties on the enemy. However, a series of tactical errors and logistical failures undermined the plan. The retreat from Muar, a crucial defensive position, further weakened the British defenses. The surviving troops were forced to withdraw to Parit Sulong, where they faced another brutal battle.
As the Japanese closed in on Johor Bahru, the British were forced to make a difficult decision. To deny the enemy a vital bridgehead, they destroyed the Johor Causeway, severing the land link between Malaya and Singapore. With the fall of Johore, the British were forced to abandon Malaya and retreat to the island fortress of Singapore.
And then a hero comes along…
The fall of Singapore was a devastating blow to the British Empire. However, even in the darkest hours, acts of extraordinary bravery emerged. One such act was the heroic last stand of Lieutenant Adnan Saidi and his men at Pasir Panjang.
Adnan, a young Malay officer, led his troops in a desperate defense against the invading Japanese forces. Outnumbered and outgunned, they fought with courage and determination, holding off the enemy for days. The battle at Pasir Panjang became a symbol of resistance and sacrifice, inspiring generations of Malaysians.
Adnan, a true patriot, paid the ultimate price for his bravery. He was captured and executed by the Japanese, but his legacy lives on. He is remembered as a national hero, a symbol of courage and sacrifice.
The Japanese, with a formidable force of approximately 70,000 troops, needed just 68 days to conquer the Malay Peninsula and Singapore—one of the most decisive victories of World War II. Following this swift campaign, northern Borneo succumbed shortly after, with Sarawak and British North Borneo falling under Japanese control by the end of January 1942, facing minimal resistance.
The fall of Malaya was a turning point that reshaped Southeast Asia’s political and military landscape. It exposed the vulnerabilities of colonial powers and the impact of underestimating an adversary. Zafrani Amran’s analysis highlights the complexities of this campaign, reminding us that history’s lessons are as vital today as they were then.
About the speaker
Zafrani Amran hails from Kota Bharu, Kelantan, a place rich in history and significant as the site of the Japanese landing during World War II. Growing up, Zafrani often visited the beach, where he saw the pillbox and heard harrowing tales of Indian soldiers, chained inside, forced to fight against the Japanese. His father, who grew up during the Japanese occupation, also shared vivid accounts of life during that time. These stories sparked his curiosity and ignited a lifelong passion for uncovering and preserving stories from the Japanese occupation of Malaya.
Reference and Reading Material:
‘Sir, They Sunk Our Battleship’: HMS Prince of Wales Changed History Forever by Maya Carlin (https://nationalinterest.org/blog/buzz/sir-they-sunk-our-battleship-hms-prince-wales-changed-history-forever-210230)
Operation Battle of Jitra from https://codenames.info/operation/battle-of-jitra/
The Fall of Malaya: Japanese Blitzkrieg on Singapore from https://warfarehistorynetwork.com/article/the-fall-of-malaya-japanese-blitzkrieg-on-singapore/
First shot in the Pacific war: What happened in Kota Baru 75 years ago today, when the Japanese arrived from https://www.pressreader.com/malaysia/the-star-malaysia-star2/20161208/281603830092588
Malayan Campaign from https://www.nlb.gov.sg/main/article-detail?cmsuuid=f2e9428f-c2cc-4c21-8a33-6ba79d03d77e
For Valour : Squadron Leader Arthur Stewart King Scarf (37693) VC Royal Air Force from https://www.rafmuseum.org.uk/blog/for-valour-squadron-leader-arthur-stewart-king-scarf-37693-vc-royal-air-force/
Commerating the Historical Event of Bukit Chandu and Lt Adnan Saidi from https://mymilitarytimes.com/index.php/2021/02/14/commerating-the-historical-event-of-bukit-chandu-and-lt-adnan-saidi/
